This tutorial provides the steps required to create Windows 10 Bootable USB. The bootable USB or Pendrive can be further used to install Windows 10 on the PCs. It provides the steps to make the bootable Pendrive using either Rufus or the Windows Disk Management Tool.
Prerequisites
This tutorial assumes that you already have the Windows 10 ISO or DVD to create Windows 10 Bootable USB. If you are creating the bootable Pendrive using Windows Disk Management Tool, it assumes that the Windows 10 ISO or DVD is mounted on the system and you can access the files of the ISO or DVD. It also assumes that you have a USB Flash Drive having at least 5 GB of space and there is no important data in it since it will be erased while following this tutorial. You can also follow How To Create Windows 10 ISO File to create the ISO file required to create Windows 10 Bootable USB.
Bootable USB Flash Drive Using Rufus
Open the Official Website of Rufus and scroll down to view the download options as shown in Fig 1.

Fig 1
Click the Download Link as highlighted in Fig 1 to start downloading the latest version of Rufus. There is no need to install Rufus since we have downloaded the executable file.
Now insert the USB Flash Drive and also get ready with the Windows 10 ISO file before executing Rufus.
Now execute Rufus. It might ask for system permissions. Click the Yes Button to allow Rufus. It shows the default options as shown in Fig 2.

Fig 2
It also auto-select the USB Flash Drive as shown in Fig 2. Now click the SELECT Button and choose the Windows 10 ISO file. It will update the options to create the bootable Pendrive or Flash Drive as shown in Fig 3.

Fig 3
Also, change the Partition scheme to MBR in case your system is very old and does not support UEFI. If you are using the motherboard supporting UEFI, keep the option GPT as shown in Fig 3.
Notes: BIOS uses the Master Boot Record (MBR) to save information about the hard drive data while UEFI uses the GUID partition table (GPT).
Now click the START Button to start creating the bootable Pendrive or Flash Drive. It will show the Warnings to erase the USB as shown in Fig 4. Make sure that you have had the backup of the data in the USB Flash Drive since this step is irreversible.

Fig 4
Click the OK Button to start creating the bootable Pendrive or Flash Drive. It will start the process and show the progress as shown in Fig 5.

Fig 5
The Success Screen should be similar to Fig 6 after creating the bootable USB Flash Drive.

Fig 6
Now close Rufus and eject the bootable USB Flash Drive having Windows 10. We can use the bootable USB to install Windows 10.
Bootable USB Flash Drive Using Windows Disk Management Tool
In this section, we will create the bootable Pendrive using the Windows Disk Management Tool. Now right-click on Start (the windows icon at the bottom left) and choose Disk Management as shown in Fig 7.

Fig 7
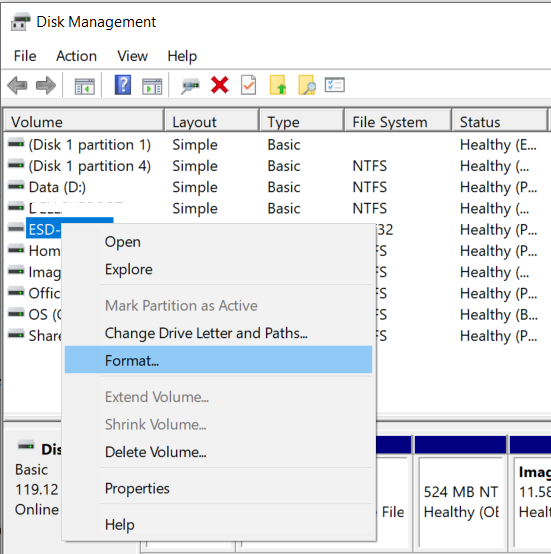
Highlight the USB Flash Drive partition by clicking it and right-click it and choose the option Format as shown in Fig 8.

Fig 8
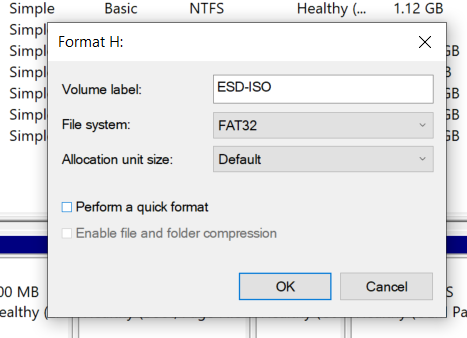
Select the FAT32 file system to be able to boot either BIOS-based or UEFI-based PCs as shown in Fig 9. Also, change the drive label if required to identify it as the Windows 10 bootable Pendrive or Flash Drive.

Fig 9
Now press the OK Button to format the USB drive. It will show the Warning Dialog as shown in Fig 10.

Fig 10
Press OK Button to accept the warning. It will erase all the existing data and format the drive using the FAT-32 file system selected by us.
MBR Only - Now again right-click the USB drive partition and click the option Mark Partition as Active. The Mark Partition as Active option remains disabled for UEFI. We can also mark the MBR partition as active using the diskpart utility as shown in Fig 11. We can start the diskpart utility by using the command diskpart on the console. It can also be started by pressing WIN + R to start the run utility and enter diskpart to start it.

Fig 11
It shows the error since the partition on my system is UEFI instead of MBR.
Now copy the Windows 10 setup files from the ISO or DVD to the USB Flash Drive.
These are the easiest steps required to create the bootable USB Flash Drive of Windows 10 without using Rufus.
Summary
This tutorial provided the steps required to create the bootable USB Flash Drive of Windows 10. The bootable Pendrive or Flash Drive can be used to install Windows 10 on the PCs.

