Ubuntu is among the popular operating systems used for production and development purposes. It might be required to try it out or run in the dual-mode without allocating dedicated hardware to it. We can run it as a guest operating system on Windows Operating System using the VMware Workstation Player without actually installing it on dedicated hardware. This tutorial provides all the steps required to install Ubuntu 20.04 LTS as a guest operating system on Windows 10 using the regular installation of VMware Workstation Player 15. The steps should be similar for other Linux operating systems.
Notes: Make sure that your Windows is 64-bit for optimal output and at least 8GB of memory is installed on the system having a multi-core processor to install Ubuntu On VMware Workstation Player.
Prerequisites
This tutorial assumes that you have access to Windows System with at least 8 GB of memory and VMware Workstation Player is already installed on it. You can also follow How To Install VMware Workstation Player On Windows 10.
Download Ubuntu
Open the Official Page to download the Ubuntu 20.04 LTS Desktop. It provides the options to download Ubuntu Desktop as shown in Fig - Download Ubuntu.

Fig - Download Ubuntu
Create the Virtual Machine
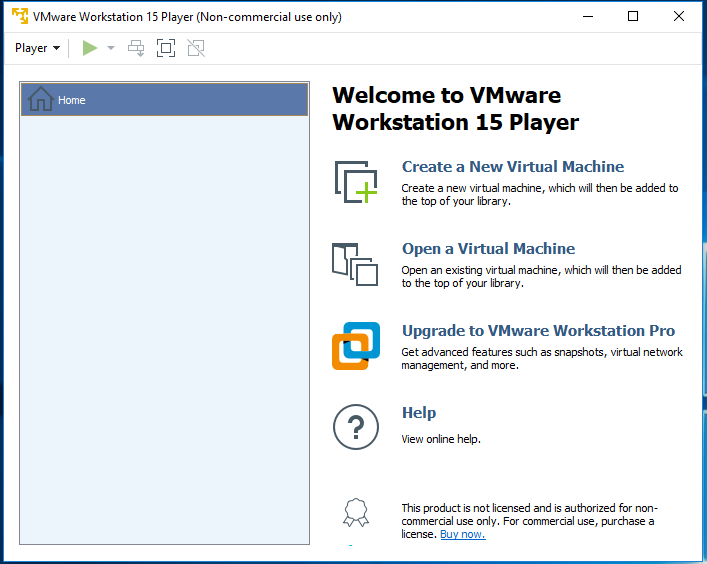
In this step, we will create the Virtual Machine used to install Ubuntu 20.04 LTS On Windows using VMware Workstation Player. Launch the VMware Workstation Player if it's not running. It will show the Welcome Screen as shown in Fig 1.

Fig 1
Click the Player -> File -> New Virtual Machine OR Create a New Virtual Machine Link as shown in Fig 2.

Fig 2
Choose the option - I will install the operating system later as shown in Fig 3.

Fig 3
Click the Next Button to choose the Operating System as shown in Fig 4.

Fig 4
Select Linux as the Guest operating system and Ubuntu 64-bit as the Version as shown in Fig 4. Now click the Next Button to configure virtual machine name and installation path as shown in Fig 5.

Fig 5
Click the Next Button to configure the disk and allocate space as shown in Fig 6.

Fig 6
The next screen provides options to confirm the virtual machine as shown in Fig 7.

Fig 7
We can also customize the hardware by clicking the Customize Hardware Button as highlighted in Fig 7. It will show the possible options to configure the virtual machine hardware as shown in Fig 8.

Fig 8
I have allocated 4GB of memory from 16GB and 4 cores from 16 cores to this virtual machine. It might differ on your system depending on your hardware. Also, choose the Ubuntu 20.04 LTS ISO as shown in Fig 8. Now click the Close Button to finalize the hardware for the virtual machine and click Finish Button to create the virtual machine as shown in Fig 9.

Fig 9
It will add the Virtual Machine to the VMware library as shown in Fig 10.

Fig 10
Install Ubuntu
In this step, we will install Ubuntu On VMware Workstation Player using the Virtual Machine created by us in the previous step. The player will also provide the options to install VMware Tools for Linux. Installing the VMware Tools is optional at this stage. We can always install it later. VMware Tools is required to have the optimal performance of the guest operating system installed on the virtual machine. Now start the virtual machine by clicking the Play Button as shown in Fig 10. It will start installing the Ubuntu as shown in Fig 11 and Fig 12 and provides the options to choose the language as shown in Fig 13.

Fig 11

Fig 12

Fig 13
Choose appropriate language and click the Install Ubuntu Button. It will provide the options to choose the Keyboard Layout as shown in Fig 14.

Fig 14
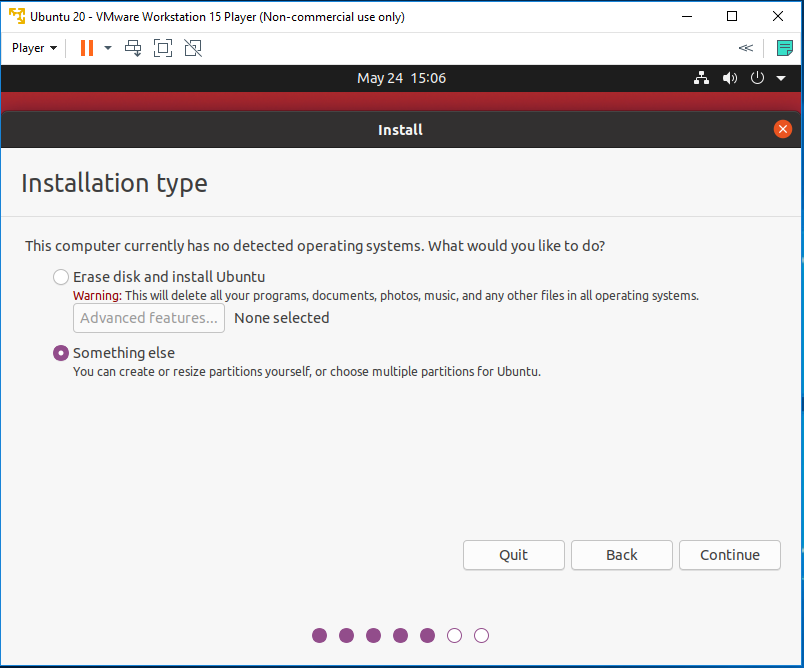
Now click the Continue Button to choose installation type as shown in Fig 15 and Fig 16.

Fig 15

Fig 16
Choose the installation type as something else as shown in Fig 16. Click the Continue Button to partition the drive as shown in Fig 17.

Fig 17
Now click the New Partition Table Button to start partitioning the drive. It will ask for confirmation to create new partitioning, partition the drive, and shows the free disk space as shown in Fig 18 and Fig 19.

Fig 18

Fig 19
Now click the Plus Icon to create the root partition as shown in Fig 20.

Fig 20
Allocate the required space to the root drive and create additional partitions if required. I have allocated the entire disk space to the root partition and configured the mount point to / as shown in Fig 20. Now click the OK Button to create the partition as shown in Fig 21.

Fig 21
Now keep the root partition selected and also check the Format Checkbox as shown in Fig 20. Click the Install Now Button to start installing Ubuntu 20.04. It will also ask to confirm the disk changes as shown in Fig 22.

Fig 22
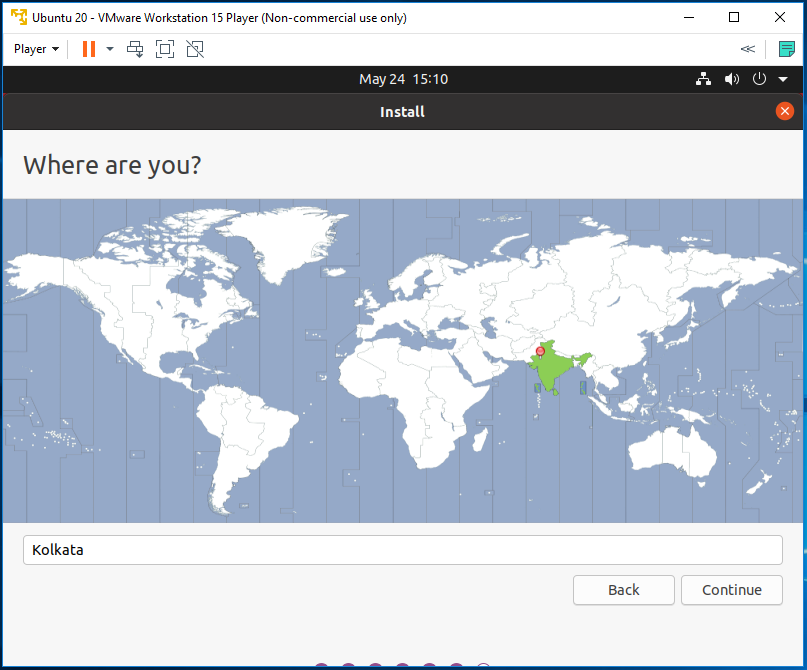
Now click the Continue Button to choose the Timezone as shown in Fig 23 and also configure the root user as shown in Fig 24.

Fig 23

Fig 24
Now click the Continue Button to continue the installation. It will show the installation progress as shown in Fig 25, Fig 26, Fig 27, and Fig 28.

Fig 25

Fig 26

Fig 27

Fig 28
It will show the success message on completing the installation as shown in Fig 29.

Fig 29
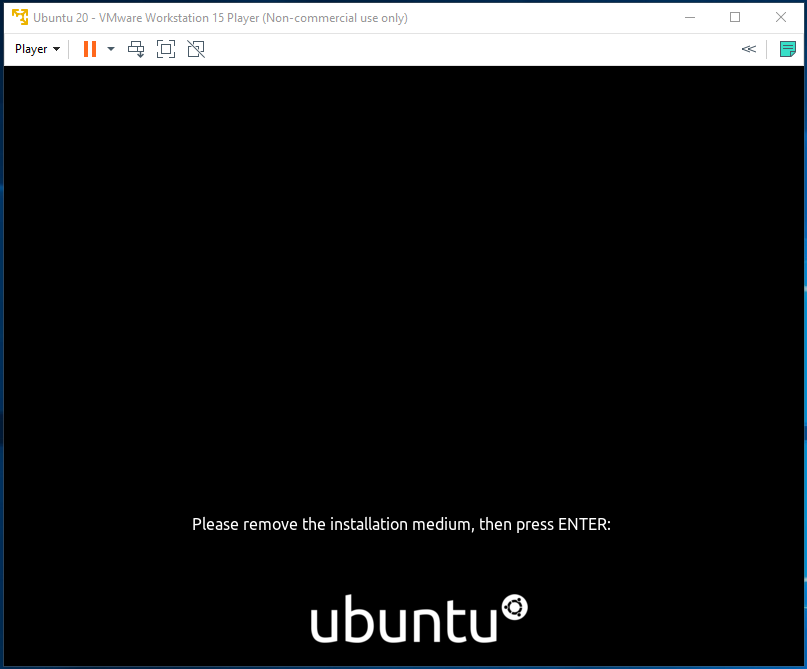
Click the Restart Now Button to restart Ubuntu It will ask to remove the installation media as shown in Fig 30.

Fig 30
Simply press the Enter Key to continue. It will show the login screen as shown in Fig 31 and Fig 32.

Fig 31

Fig 32
Now enter the password provided by you while installing Ubuntu. The player will show the Ubuntu Dashboard as shown in Fig 33 and shows the intro steps as shown in Fig 34, Fig 35, Fig 36, Fig 37, and Fig 38.

Fig 33

Fig 34

Fig 35

Fig 36

Fig 37

Fig 38
This completes the installation of Ubuntu 20.04 LTS on Windows 10 using the VMware Workstation Player.
Install VMware Tools
It's preferred to install VMware Tools for optimal performance as mentioned by me in the previous step. To get more details, maximize the VMware Workstation Player. We can see that Ubuntu does not cover the entire area of the Window.
We can resolve this issue by installing VMware Tools. You can follow How To Install VMware Tools In Ubuntu 18.04 LTS. The steps should be the same for Ubuntu 20.04 LTS.
Summary
This tutorial explained the steps required to download the Ubuntu Desktop Image from the official website of Ubuntu. It also explained the steps to create the virtual machine using the VMware Player and install Ubuntu Desktop as a guest operating system on it. This comes handy in several situations when we do not have options to install Ubuntu directly on the hardware. Keep commenting to join the discussion about installing Ubuntu as a virtual machine on VMware Workstation Player using the comment options as shown below.

