Eclipse is the most popular IDE used for Java application development. The other popular options for Java development include IntelliJ IDEA and NetBeans.
Notes: It assumes that Java is already installed on the system. You may also be interested in How To Install OpenJDK 12 On Ubuntu and How To Install Java 11 On Ubuntu. You can also follow How To Install IntelliJ IDEA for Java on Ubuntu to install IntelliJ IDEA on the popular Debian based Linux distribution - Ubuntu.
Download Eclipse For Java
Open the Eclipse Packages Page to view the various Eclipse packages distributed by the Eclipse community. It lists the Java packages as shown in Fig 1.

Fig 1
Eclipse IDE for Enterprise Java Development and Eclipse IDE for Java Developers are the popular Java packages distributed by the Eclipse Foundation. I will cover the installation of Eclipse IDE for Java Developers and creating the Hello World Project to print Hello Java !! on the console.
Click on the link Eclipse IDE for Java Developers to view the description, features, and download options as shown in Fig 2.

Fig 2
Click on the Linux 64-bit Link to view the download locations for Eclipse For Java Developers as shown in Fig 3.

Fig 3
Click on the Download Button to start the download.
Install Eclipse For Java Developers
In this step, we will install Eclipse for Java as downloaded by us in the previous step. Extract the Eclipse file downloaded by us to the preferred location. It should be similar to the one as shown in Fig 4.

Fig 4
Create Desktop Shortcut
In this step, we will install the GNOME panel and use the same to create a desktop shortcut to execute the Eclipse installed by us in previous steps.
# Refresh Package indexes
sudo apt-get update

# Install GNOME Panel
sudo apt-get install --no-install-recommends gnome-panel

# Create Desktop icon
gnome-desktop-item-edit ~/Desktop/ --create-new
Now configure the Eclipse installation as shown in Fig 5. We will use the Eclipse icon available in the root of the installation directory.

Fig 5
Provide name and description of the shortcut as shown in Fig 5. Now click on the Browse
Press the OK

Fig 6
Click on the Trust and Launch Button to launch the IDE for the first time.
Execute Eclipse and Configure Workspace
In this step, we will execute the Eclipse and configure the workspace. A workspace is a collection of projects and arrangement of the development IDE.
Start Eclipse by either clicking the executable file from installation path or the desktop shortcut icon created by us. It will show the splash screen and show the dialog to choose workspace as shown in Fig 7.

Fig 7
Make sure that you have kept the checkbox to choose workspace at start of Eclipse as unchecked so that we can select a different workspace at the start of Eclipse.
Now click on the Launch Button to launch the Eclipse IDE with the selected workspace. It might ask to overwrite the workspace in case it was created by previous Eclipse installation as shown in Fig 8.

Fig 8
Click on the Continue Button. The Eclipse will show the welcome screen as shown in Fig 9.

Fig 9
Close the Welcome Screen. The default workspace looks like the one shown in Fig 10.

Fig 10
Hello World Project
In this step, we will create the Hello World Project and print Hello Java !! on Console. Click on File -> New -> Java Project to start creating the project. It will show the Create Java Project Wizard as shown in Fig 11.

Fig 11
Click on the Next Button to continue with Project Java Settings as shown in Fig 12.

Fig 12
Now click on the Finish

Fig 13
I have skipped creating the module as part of this tutorial. Finally, it will create the project and show it on the Projects Panel as shown in Fig 14.

Fig 14
Now we will create the java file HelloJava.java. Right-click on the src folder, select New and click on

Fig 15
Click on the Finish to create the Java Class using the class package as shown in Fig 15.

Fig 16
Now update the HelloJava class as shown in Fig 17.

Fig 17
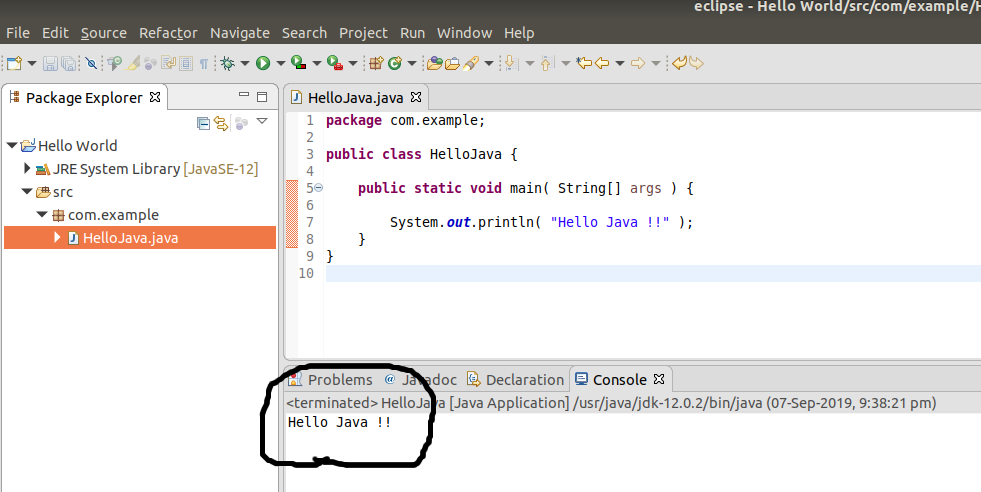
Now right click on the HelloJava.java File -> Run As -> Java Application to compile and execute the program. It will show the output on Console as shown in Fig 18.

Fig 18
This is how we can install Eclipse for Java Developers on the Ubuntu systems and to create the project and execute Java programs.

